|
About
Materials
First, especially if you
are a student, avoid any paints, papers, brushes, etc. that advertise themselves as
"student grade". Only the best, most experienced painters could do a
competent painting with that stuff, and they choose wisely not to.
I use mostly nylon or
nylon/sable brushes because I'm so hard on them. They last a long time and take a lot of
abuse. I use flats ( 3/4", 1" and a 2" flat brushes.
Brushes. #8 and #12 pointed, and a no. 4 rigger. I have several sable and nylon of each.
I use a mixture of smaller brushes for details.
Paper: I have tried many, but always come back to Arches. I use rough and cold-pressed
textures and in 140# and 300# weights. I like 140# for paintings that will be mostly
one-pass and wet and the 300# for multiple glazes. This is not the place to cut cost.
Stick to the best brands. Winsor & Newton, Fabriano, Kilimanjaro and
others make high quality paper.
Colors: Winsor & Newton, Grumbacher, Holbein, Daniel Smith - Ultramarine Blue, Winsor
Blue, Permanent Rose, Alizarin Crimson, Cadmium Scarlet, Aureolin, New Gamboge, Burnt
Sienna, Raw Sienna, Burnt Umber. I also keep Yellow Ochre, Cerulean Blue, Indian Red,
Cadmium Orange, Raw Umber, and Winsor Green available. I add or subtract colors sometimes,
depending on the subject. I try to have a warm and cool version of red, yellow, blue at
all times.
Masking: I usually don't mask, but I use W & N yellow mask and remove it with a rubber
cement pickup, aka crepe eraser. I've tried white masking fluid, but it's
harder to see as you're applying it to the paper.
Tools: Two big bowls of water, a large sponge, paper towels, tissues, X-acto knife, and
several things to make marks with, such as credit cards, single edge razor, beveled handle
on aquarelle brushes, etc.
I usually tape the paper to a piece of masonite, overlapping onto the paper about
1/2". This leaves a white border around the painting after the tape is removed, but
more often than not, I end up cropping the painting from one edge or another. I never
stretch the paper, but I do wet the entire sheet at the beginning. This seems to tighten
it up when it dries and minimizes buckling through the rest of the painting process. I've
tried clipping the paper to the board, but I like to have the board lie flat on my
slightly tilted table. With 300# paper, you don't have to worry about
buckling or stretching paper.
PROCESS
I always do at least one small sketch,
and usually more, to organize the tones and shapes before making the final light pencil
sketch on the watercolor paper. I try to have a good idea of which areas will be done wet
into wet and remain that way and which ones could be rewet or painted wet on dry. I
usually wet the entire paper before starting and then dry the areas that I want to remain
white by wiping with tissues. This allows for soft edges, but helps control the pigment
from running into areas where I don't want it. As long as the brush and pigment don't add
more water to the surface, the pigment will stay pretty much where you put it, but will
still diffuse enough to get that beautiful "wet" look where you need it. One of
the key learning points in watercolor is to develop a feel for how wet the paper really is,
how much pigment in the brush and how wet the brush is. It's frustrating at first, but if
you keep at it, you''ll get the idea.
Let me stress once more how
important it is to have some sort of plan before you get into the fun of throwing all that
wonderful color around. It's easy to overdo it and find that you've gone beyond the point
where you should have stopped to think about it. I have included some typical sketches
that I used to create a plan for myself, along with the finished paintings.
I used a medium grey marker, a black one, and the white of the paper
for these.
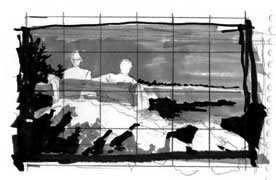
Here's a sample of a sketch of two people
relaxing at the ocean. It has my grid lines on it for enlarging to the final drawing. I
use a grey marker, a black one, and the white of the paper to establish 3 main tones. |
|
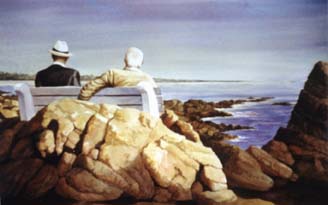
| This is the finished painting. I
stayed fairly close to the plan, but it seems as if you never really know how it will come
out. That's the fun of watercolor. " OLD FRIENDS" 20" X 28" |
|
Well, allllll righty
then.........next
NOTES page OR RETURN TO MAIN MENU
|
|